The best RV leveling setup for most people is a set of interlocking blocks like the Lynx Levelers: cheap, versatile, and good for almost any rig, for around $50. If you would rather skip the stacking and math, the Andersen Camper Leveler lets you drive on and stop when level in seconds, and it is our pick for the easiest leveling of all.
Leveling is not just about comfort, though a rig that tilts will drive you crazy at night. A camper that sits level keeps the doors and slides working right, lets your absorption fridge cool properly, and helps the holding tanks drain.
Which leveler you want comes down to how much you are willing to spend and whether you prefer stacking blocks or driving on a ramp. Below are the picks, the two types explained, and how to level your rig step by step.
| Best for | Our pick | Price |
|---|---|---|
| Easiest, fastest (best overall) | Andersen Camper Leveler (2-pack) | $80 to $90 |
| Best value blocks (most versatile) | Lynx Levelers 10-pack | $45 to $55 |
| Budget and weekend trips | Camco Leveling Blocks 10-pack | $30 to $35 |
Why leveling your RV matters
A level rig is more than a nicety. Several important systems only work right when your camper sits flat.
Your fridge is the big one. Many RV refrigerators use absorption cooling, which relies on gravity to circulate the coolant, so parking badly off-level can hurt cooling and, over time, damage the fridge.
Level also means your doors and slide-outs operate smoothly, your holding tanks drain fully, and you sleep without sliding to one side of the bed. It takes a few minutes to get right and it improves the whole stay.
The two types of RV levelers: blocks and drive-on ramps
Nearly every leveler falls into one of two camps. They do the same job in different ways, and the right one depends on how much fuss you will tolerate.
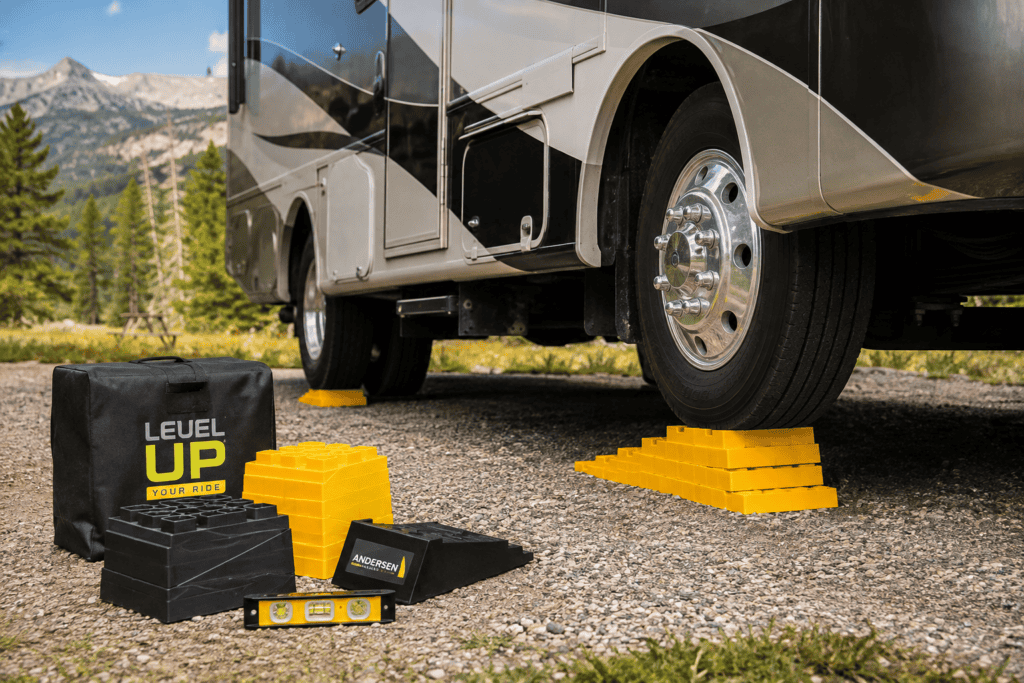
Interlocking blocks: stackable plastic squares (think oversized Lego) that you build into a ramp, drive onto, and stop on. They are cheap and versatile: they work under single or dual tires, under tongue jacks, and under stabilizers. The trade-off is that you have to guess the height, stack them, and sometimes restack.
Drive-on curved levelers: a one-piece curved ramp like the Andersen. You drive up until the rig reads level, then wedge the included chock to lock it there. No stacking and no math, which is why so many RVers love them, but they cost more.
The best RV leveling blocks and levelers
Here are our picks, from the easiest drive-on leveler to the cheapest blocks. Start with the one that fits your budget and patience.
Best overall for easy leveling: Andersen Camper Leveler
If you want leveling to take seconds and zero guesswork, the Andersen Camper Leveler is the one to buy. You place it in front of the low-side tire, drive up until a built-in level reads flat, and slide the included rubber chock in to lock the height.
There is no stacking and no doing it twice, and it is rated up to 30,000 pounds, so it suits everything from a small trailer to a big fifth wheel. It levels the low side of your rig, so single-axle trailers need one and tandem-axle trailers use two, which is why the 2-pack is the common buy.
Pros
- Drive on and stop when level, no stacking
- Precise height, no guessing or restacking
- Rated up to 30,000 pounds
- Includes a rubber chock and grip mat
Cons
- Costs more than a set of blocks
- Tandem axles need two, so buy the 2-pack
- Can slip on smooth surfaces without the mat
Andersen Camper Leveler (2-pack)
Drive on, stop when level, and lock it in seconds. No stacking or math, rated to 30,000 pounds. The easiest way to level a rig.
Check price ›Best interlocking blocks: Lynx Levelers
For most RVers, a 10-pack of Lynx Levelers is the smartest all-around buy. The interlocking blocks stack into a sturdy pyramid ramp and lock together so they do not spread out under the weight of your rig.
They are the most versatile tool in the bay: use them to build a ramp for the low-side tires, to shim under a tongue jack, or to give stabilizer jacks a solid base. For around $50, they cover nearly every leveling job you will meet.
Tri-Lynx Lynx Levelers (10-pack)
Sturdy interlocking blocks that stack into a locking ramp and work under tires, jacks, and stabilizers. The best all-around value.
Check price ›Best budget: Camco Leveling Blocks
If you just want reliable blocks for the least money, the Camco Leveling Blocks 10-pack does the job. They are the classic yellow interlocking blocks, and they stack and lock the same way the Lynx do.
They are a touch less rugged than the Lynx under heavy rigs, but for a lighter trailer or occasional use they are hard to beat at around $30. It is the cheapest way to get a full leveling kit.
Camco Leveling Blocks (10-pack)
The classic cheap interlocking blocks: stack, lock, and drive on. The value pick for lighter rigs and occasional trips.
Check price ›Do not forget wheel chocks
Leveling lifts your rig; chocks keep it from rolling. They are a safety essential, not an accessory, and you should set them every time you park.
For travel trailers with two axles close together, an X-Chock style stabilizer is the best choice. It ratchets outward between the two tires on each side, which both blocks rolling and cuts the side-to-side rock that makes a trailer feel wobbly inside.
X-Chock wheel stabilizer (pair)
Ratchets between the tires of a tandem axle to stop rolling and reduce rocking. The chock most trailer owners swear by.
Check price ›How to choose RV leveling blocks
Three questions settle which leveler is right for you. Run through them and the choice is usually clear.
- Blocks or drive-on ramp If you value simplicity over saving money, get the drive-on Andersen. If you want the cheapest and most versatile option, get interlocking blocks.
- How heavy your rig is Big fifth wheels and motorhomes want a leveler rated for the weight (the Andersen handles up to 30,000 pounds) and sturdier blocks like the Lynx. Light trailers can use budget blocks.
- How much you value your time If you camp often and hate re-parking to restack blocks, the seconds the Andersen saves add up fast. Occasional campers do fine with blocks.
How to level your RV, step by step
Level side-to-side first, then front-to-back. Do it in that order and the job is quick and safe.
- Check which way it leans Set a level inside on the floor, or use a phone app, to see which side and end are low. Level the side-to-side tilt before anything else.
- Raise the low side Place your blocks or Andersen leveler in front of the low-side tires, then pull forward or back onto them until the rig reads level across. On a tandem axle, lift both tires on that side.
- Chock the wheels Once the side-to-side is right, set your wheel chocks on both sides before you unhitch or touch the jacks. This is the safety step, so never skip it.
- Level front-to-back Use the tongue jack (travel trailer) or the landing gear (fifth wheel) to raise or lower the front until the rig is level end to end. Put a block under the jack foot on soft ground.
- Drop the stabilizers Lower the stabilizer jacks until they are firm, resting on blocks if the ground is soft. Stabilizers steady the rig; they are not meant to lift or level it.
The bottom line
Match the leveler to your patience and budget. Most RVers are well served by a 10-pack of interlocking blocks like the Lynx Levelers, the most versatile and best-value choice.
If you would rather drive on and be level in seconds, the Andersen Camper Leveler is worth the extra money, and budget campers will do fine with Camco blocks. Whichever you choose, pair it with wheel chocks and level side-to-side before front-to-back.
Kitting out the rest of your rig? See our RV gear guides, including the best RV sewer hose and best RV water filter.